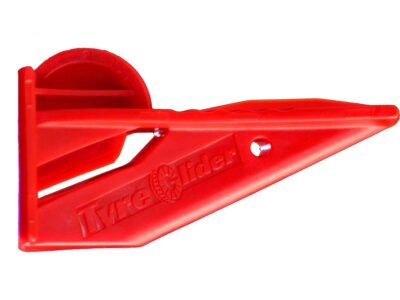
The Tyre Glider is a small and compact evolution of the tyre levers currently on the market. It’s unique design and features ensures that changing a bicycle tyre is now accessible to all individuals and completes the task in a more efficient manner allowing for the swift removal and installation of even the most tight-fitting tyres across all the bicycle disciplines.
Key Feature 1
The pending patent ‘wing’ clip on glides the tyre back onto the rim. Once the Tyre Glider encounters resistance, the ergonomic design allows the users to use the full force of their bodyweight in a downwards trajectory which results in the tyres resistance lowering to the point where it pops back onto the rim with ease.
Key feature 2
Wider scoop pulls more bead over the rim. As you then pull down unlike traditional tyre levers the Tyre Glider sits perfectly and securely onto the brake track of the bike wheel in a horizontal fashion. Push forward to remove.
How to remove a tyre?
- Push in the Tyre bead in to create a gap.
- Position Tyre Glider in the gap and then ‘scoop’ the lip fully under the bead.
- Lever the tool back pulling the bead over the wheel rim.
- Push in a forward & downward motion to glide the tyre off the rim.
How to install a tyre?
- Starting at the valve, Clip the Tyre Glider onto the rim.
- Using your palm push your Tyre Glider forward.
- The bead will seat itself as you push Tyre Glider around the wheel.
How to install a tight tyre?
-
- Follow the “install tyre” steps first.
- When you encounter resistance, stand with the wheel between your legs and use your bodyweight to push down.
- For really tight fitting tyres, use your thumb to help install the last bit of bead onto the tyre.


